Back to blog
Mar 17 2024
Understanding ASTs Through Creating a Custom ESLint Rule
Hello again! Today I'd like to explore a topic that you may not have come across if you don't have a background in computer science or an affinity towards static analysis. We are going to dive into the world of ASTs and once we have a firm grasp of the topic, apply our knowledge into building a custom ESLint rule. As far as prerequisite knowledge goes for this article, I would like readers to have familiarity with JavaScript and specifically some experience with ESLint. I'll try my best to define everything as we go and if that isn't enough I'll link some resources to hopefully clear things up. With that, let's get started.
Getting Started with ASTs
First off... what is an AST? ASTs or Abstract Syntax Trees are tree representations of code. The nodes of the tree are organized in such a way where the children of any given node are smaller syntactic units from that of its parent node. There are two fundamental processes that go into building an AST: tokenization and parsing.
Tokenization is concerned with taking a stream of characters as input and outputs a linear list of tokens. Once tokens are created, they need to be transformed into a hierarchical tree that defines the grammatical structure of the tokens, which is known as parsing. We said a lot just then... how're you doing? Let's use an example to illustrate this definition.
I find it best to learn by doing so let's get a visual for these AbstractSyntax Trees that we're talking about. Navigate over to astexplorer.net in a new browser tab so we can paste our own code and inspect the corresponding AST. You should see something like the following:
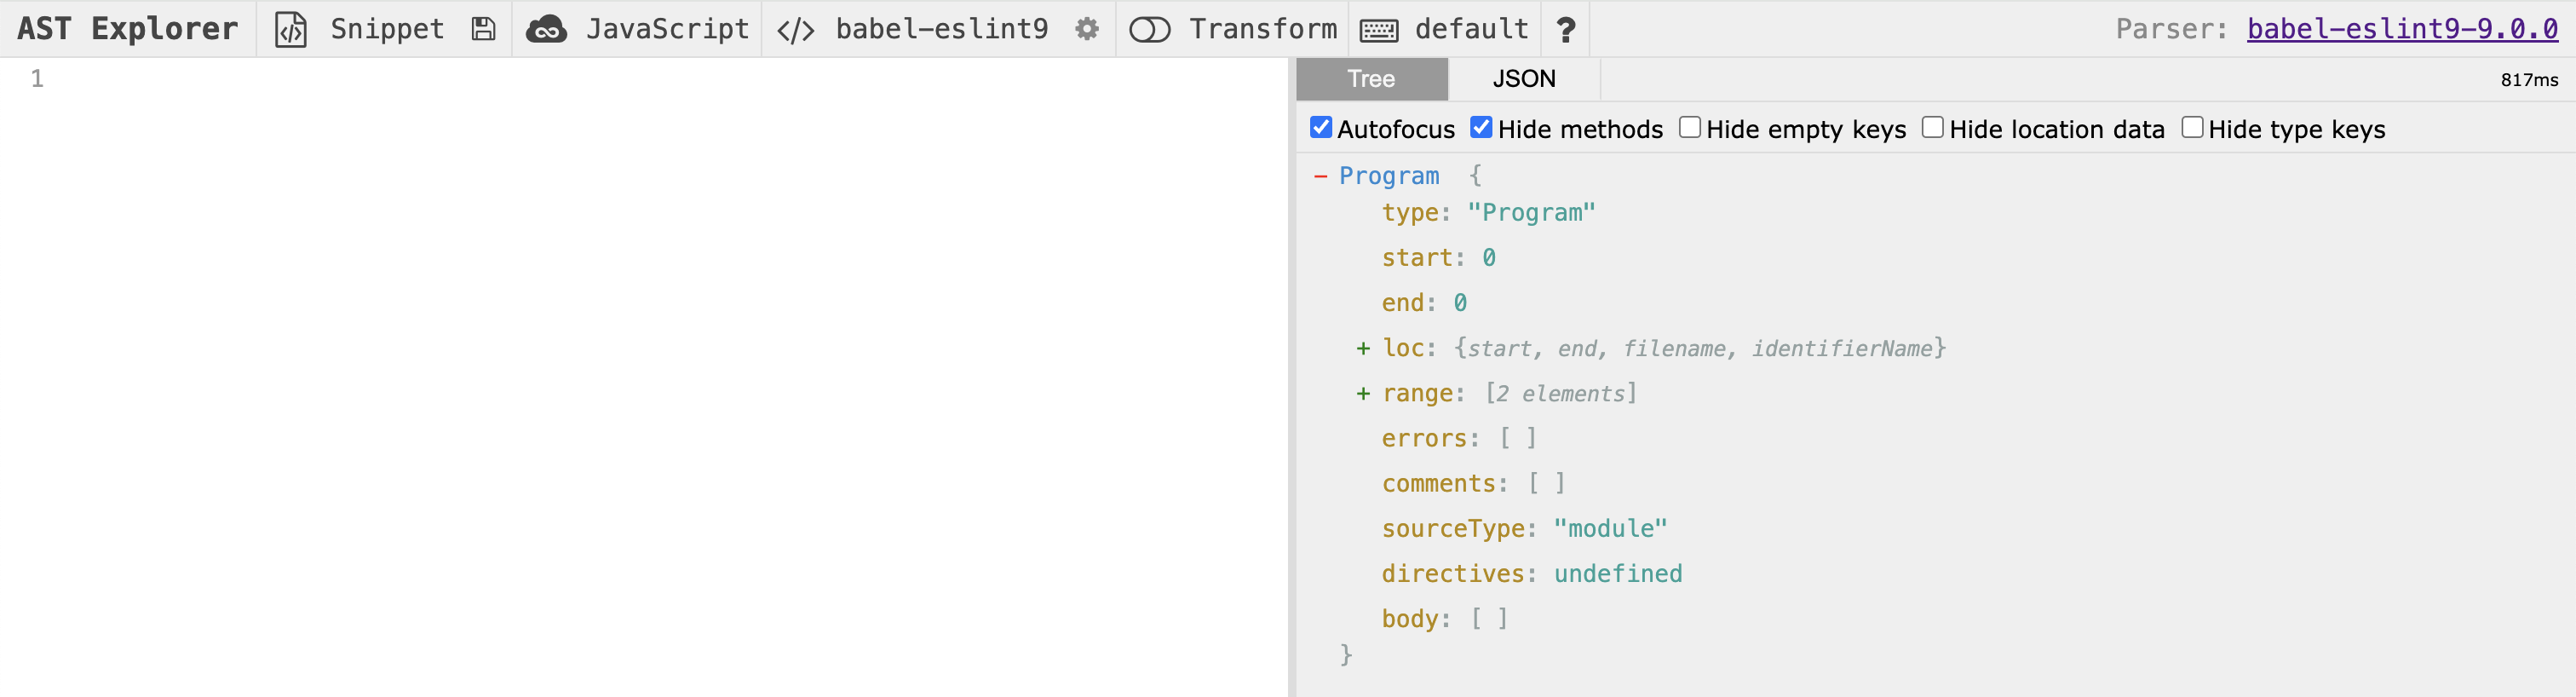
At the top of the website you should see some configuration options. In my screenshot, "JavaScript" is the programming language we will be using in our code snippet. We'll place our example code on the left hand side of the screen below the toolbar. The next item, "babel-eslint9" is the parser option I've selected and will help us build the AST that we are concerned with. Don't worry about the other options available in the toolbar. Finally, on the right side of the screen you'll see "Tree" highlighted followed by some text. In my screenshot, we see "Program" followed by an object with some properties. This is the AST for our empty program! Let's add some code to continue reasoning through ASTs. Add the following code snippet into the text area on the left side of the site (below to the toolbar):
          function bar() {
            const a = 1;
            console.log(2 + a);
          }
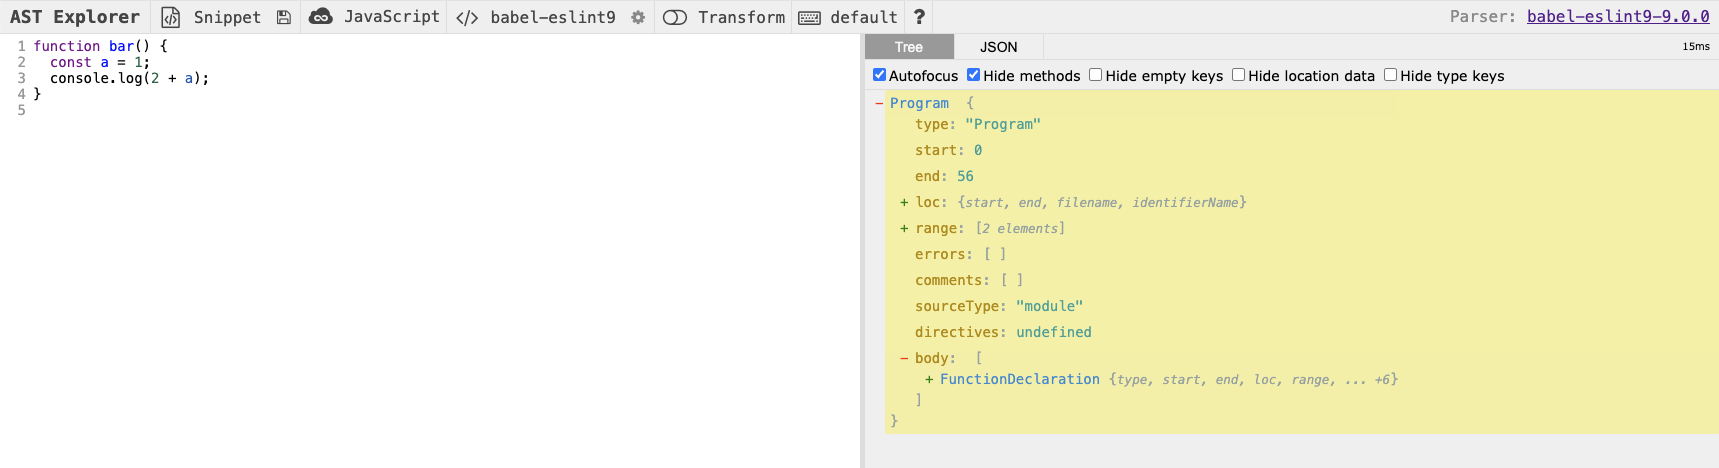
Now that we have some code added into our AST Explorer editor, do you notice anything different about the tree view on the right hand side? The body has changed and has a FunctionDeclaration entry! This FunctionDeclaration corresponds to the snippet we added, the function bar. Let's continue to inspect the AST for another level. Before we expand, can you guess what might be contained at the next level? Look at our code snippet for a hint!

Did you guess right? I know I didn't when I first started learning about ASTs 😅. But let's revisit our understanding of ASTs. In the beginning, we mentioned that "nodes of the tree are organized in such a way where the children of any given node are smaller syntactic units". Does this definition make more sense now after this example? We can see that we have the following hierarchy of syntactic units so far:
- Program - the root of our code
- FunctionDeclaration - function bar()
- BlockStatement - the body of our function e.g. what is contained within
- ... more AST nodes as they relate to the rest of our program
You can see from the hierarchy above that each node of our tree is a smaller syntactic unit of that of its parent. If we continued down the tree, our result would be:
- Program - the root of our code
- FunctionDeclaration - function bar()
- BlockStatement - the body of our function e.g. what is contained within
- VariableDeclaration - const a = 1;
- VariableDeclarator - a
- ExpressionStatement - console.log(a + 1)
- CallExpression - log(a + 1);
Nice work! Hopefully now you have a grasp of what an AST is and how our code might be translated into an AST. But let's push further. ESLint is one of the most popular static code analysis tools for identifying issues with JavaScript code. Chances are, if you worked with a production grade JavaScript codebase you have probably worked with ESLint. We can apply our knowledge of ASTs to write our own custom ESLint rule.
ASTs in Action With ESLint
ESLint, as you may know, is a configurable JavaScript linter. ESLint helps us catch problematic patterns of JavaScript code as well as coaches us towards the style guidelines of a particular project. At the core, ESLint rules are the most foundational piece of the system. You can think of ESLint rules as a type of lint and we can define our own custom rules to define what patterns and styles we care about in our JavaScript code. When writing a custom rule, we use ESLint's built-in visitor methods to inspect the AST of JavaScript code and flag whatever problematic code we want. For the purposes of this exercise, let's say we want to create a custom rule that flags any constant variable declaration that has a non uppercase name. For example we would flag "const abc = 1;" but not "const ABC = 1;".
Now that we have the problem scoped, can you think of which AST nodes we would want to look for given this type of lint we are trying to achieve? We know we are concerned with variable declaration statements so that would be a great place to start. Let's get our project setup. First let's setup a new project by running these commands in your terminal of choice:
          mkdir custom-eslint-rule
          cd custom-eslint-rule
          npm init -y
          npm install --save-dev eslint
          touch all-uppercase-const-declarations.js
          touch all-uppercase-const-declarations.test.js
What we're doing above is creating a new project with NPM as our package manager. We are also creating one file to house our custom lint's logic and another to test the logic. Next, let's stub out all-uppercase-const-declarations.js with the template of a custom rule. Make sure it has the following contents:
          module.exports = {
            meta: {},
            create(context) {
              return {};
            },
          };
Great! Now we have a module that has two important properties. The first is the meta property. Meta refers to the metadata associated with the rule that we are creating and you can find more specifics about that here. The next is the create property. This is where all of our custom rule logic will be housed. Notice the context object that is the input parameter to the create function. The context object has properties like the id of the rule, the filename being visited, the current working directory and much more. But for the purposes of this article we'll skip over the other details. Let's add some more code to all-uppercase-const-declarations.js:
          module.exports = {
            meta: {
              type: "problem",
              docs: {
                description:
                  "A rule that enforces all constant variable declaration names be uppercase.",
              },
            },

            create(context) {
              return {
                VariableDeclarator(node) {},
              };
            },
          };
Now we've added some documentation to our lint so when violations do occur, developers are aware of why code was flagged. We've also added a VariableDeclarator visitor method. But what does that mean? Essentially, when the AST is built, lint rules are run against the AST to flag problematic patterns. The visitor methods provided by ESLint allow us to access the AST and inspect the underlying code to do our analysis. Let's finish up our custom rule in all-uppercase-const-declarations.js:
          module.exports = {
            meta: {
              type: "problem",
              docs: {
                description:
                  "A rule that enforces all constant variable declaration names be uppercase.",
              },
            },

            create(context) {
              return {
                VariableDeclarator(node) {
                  const parentNode = node.parent;
                  const nodeName = node.id.name;
                  if (
                    parentNode.kind === "const" &&
                    nodeName !== nodeName.toUpperCase()
                  ) {
                    context.report({
                      node,
                      message: "All constant variable declarations must be uppercase.",
                    });
                  }
                },
              };
            },
          };
Now we've filled out the rest of all-uppercase-const-declarations.js. We are looking at the parent of the VariableDeclarator, which we know from our exercise above with ASTs is the VariableDeclaration and checking if the declaration is of constant type. Next we are looking at the node name from the identifier of the declarator node and comparing that to the uppercase version of itself. If the declaration name isn't all uppercase, we use the context report method to report the error. But now let's test out our lint! Open up all-uppercase-const-declarations.test.js and ensure the contents look like:
          const { RuleTester } = require("eslint");

          const rule = require("./all-uppercase-const-declarations");

          const ruleTester = new RuleTester({ parserOptions: { ecmaVersion: 2015 } });

          ruleTester.run("all-uppercase-const-declarations", rule, {
            valid: [{ code: "const ABC = 1;" }],
            invalid: [{ code: "const abc = 1;", errors: 1 }],
          });

          console.log("If we made it this far our test passed!");
We are using the RuleTester helper that ESLint provides and using the run method that supports inputting our own valid and invalid test cases. The way we do this is by defining object entries keyed by the property name code and valued by a string representation of the code we want to test. As you can see, we are testing the happy path of a valid test case with our variable in uppercase format. But, in the invalid case we have all lowercase for the variable name. We indicate to the RuleTester that there should be one error by providing the errors key followed by the number of expected errors. Finally, we add a console statement at the end of our code block that will show if RuleTester doesn't throw as the result of a lint error. Let's give this a try by running: "node all-uppercase-const-declarations.test.js" in your terminal window. That passed! Now let's update the invalid test case entry to be all uppercase and leave everything else as is. Run the test again. You should see a thrown assertion error like "AssertionError [ERR_ASSERTION]: Should have 1 error but had 0: []". That is because now our invalid test case is now a valid one. Feel free to mess around with the test cases to iron out our code!
Well, that is all I have today! Definitely check out the ESLint documentation for more information but hopefully you left learning something new today. Static analysis is a really interesting and important topic for developer productivity. Who knows, maybe you'll write a lint for your workplace some time in the near future! Cheers!